Zoho CRM 2 Moodle: Installation and User Guide
Installation Steps:
- Login into Zoho CRM using your admin login.
- Go to Zoho Marketplace and search for 'Moodle for Zoho CRM' extension.
- Click install.
- Once installed then set the following extension settings:
- Moodle API URL: e.g: https:yourmoodledomain/webservice/rest/server.php (http
or https: depends on your moodle application server) - Moodle API Key: e.g: cfeb9XXXXXXXXXXXXXXXXXXXXXXXXXX90d
How to get a Moodle API Key:
To get a Moodle API Key please follow the steps below:
To get a Moodle API Key please follow the steps below:
Step 1 - Login to your Moodle site as an Administrator.
Step 2 - Check if Web service is enabled.
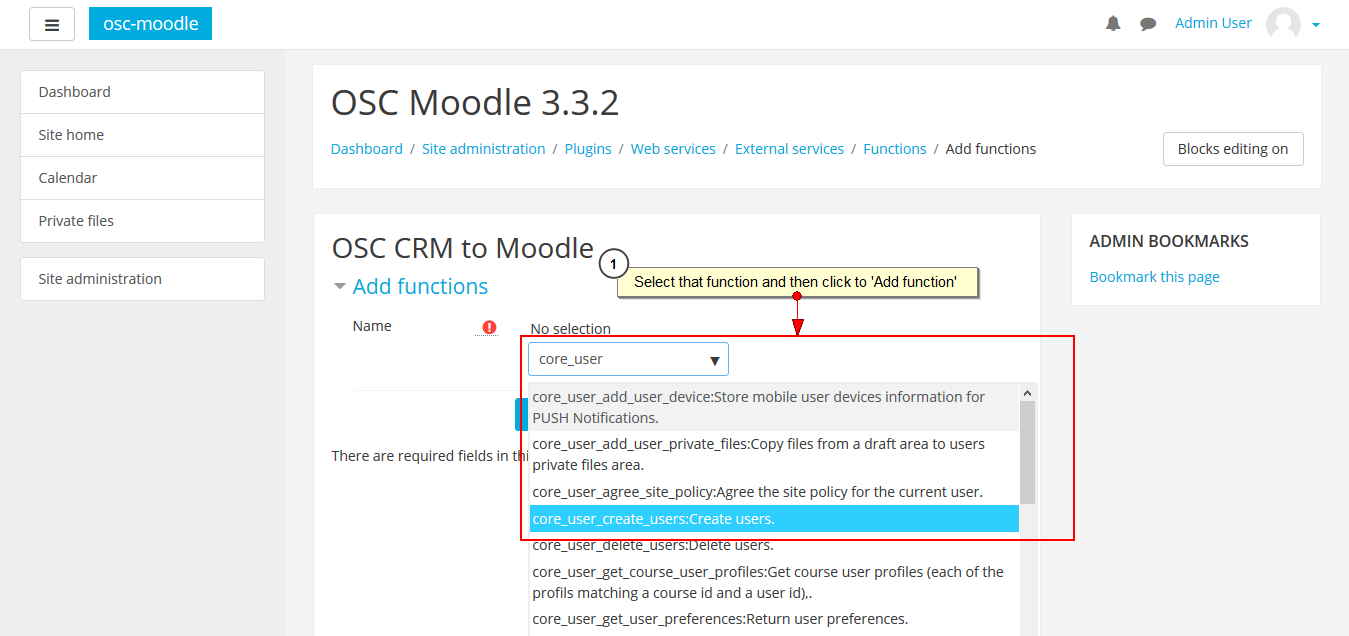
- Then click the Add Service button and you will be redirected to the Add Functions page
- Once redirected click Add Functions.

- A form will be open where you can add functions.
- Choose the function: core_user_create_users.
- And click 'Add Function'.
Step 4 - Check the REST Protocol is enabled.
- Go to site administration > Plugins > Web services > Manage Protocols.

Step 5 - Add Token
- The saved Token will be listed.
- Copy the token and place it into the extension settings field 'Moodle API Key.

How it works:
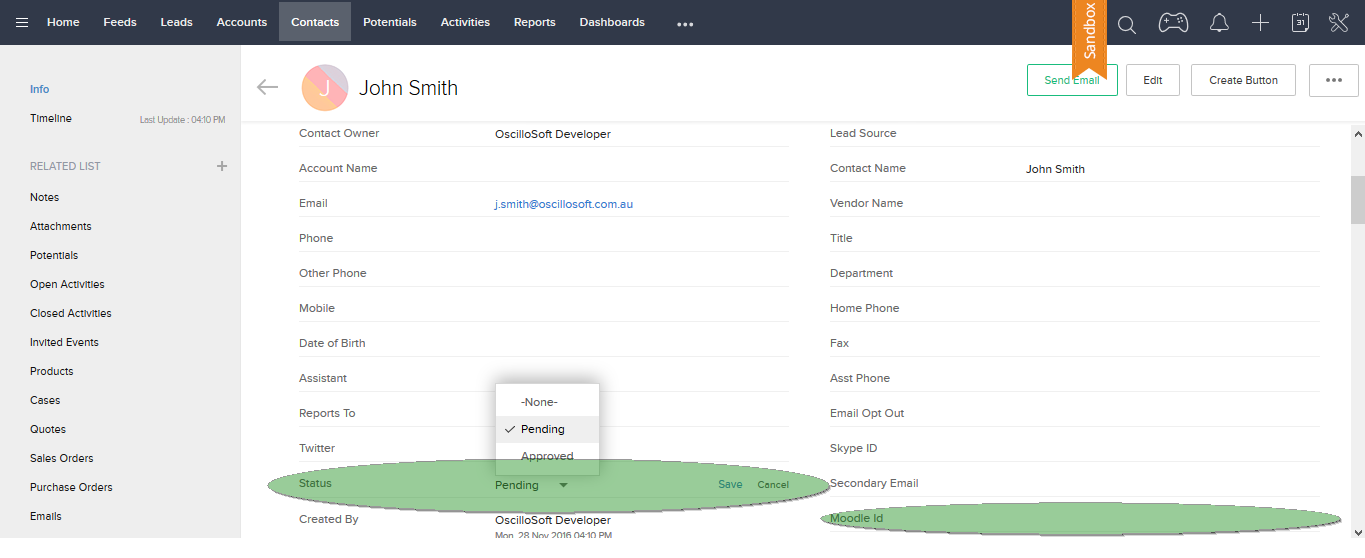
- Once this extension has been installed into the CRM, two fields will be created in the Contacts Module:
- Status (Picklist: Pending and Approved).
- Moodle ID (Number).
- The Moodle API URL and Moodle API Key need to be set when you install the Extension.
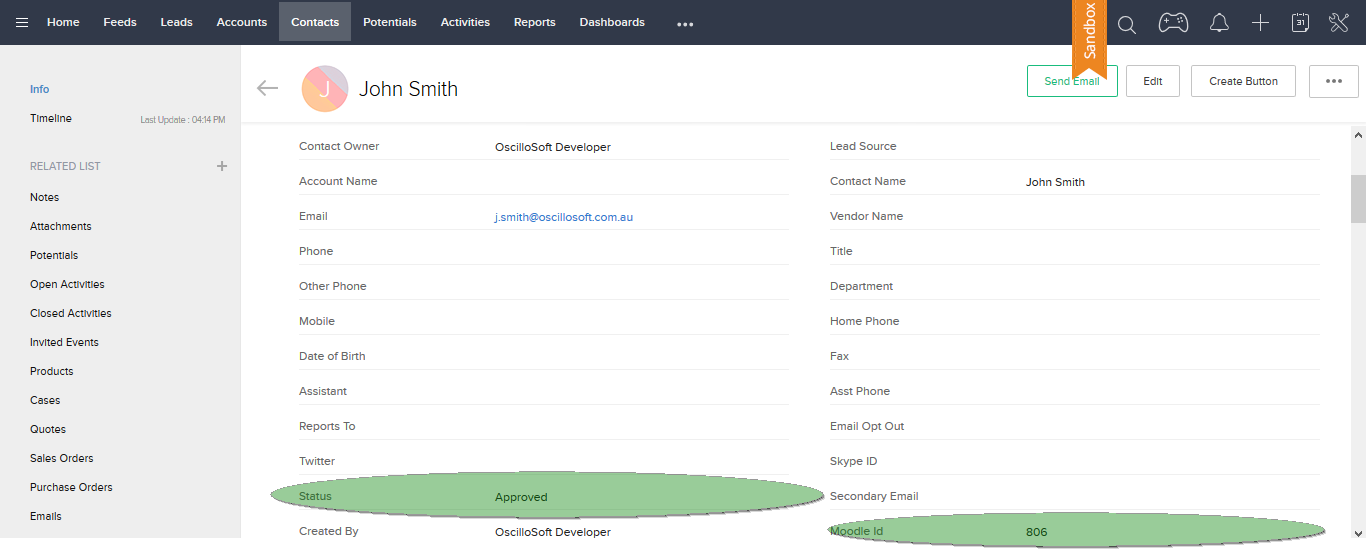
- When a new contact is created with the status 'Approved' in the CRM contact Module, the contacts basic information will be pushed to Moodle with a default Moodle login password ' Password1! '.
- When a status has been updated from 'Pending' to 'Approved' in the CRM Contact Module, the contact's basic information will be pushed to Moodle with a default Moodle login password ' Password1! '.
- A Moodle username will be generated with Alphanumeric characters based on the contact' email address (e.g. If an email address is john.smith.2+dev@oscillosoft.com.au the Moodle username will be generated as johnsmith2devoscillosoftcomau).
- Each CRM Contact will need to have a unique email address.
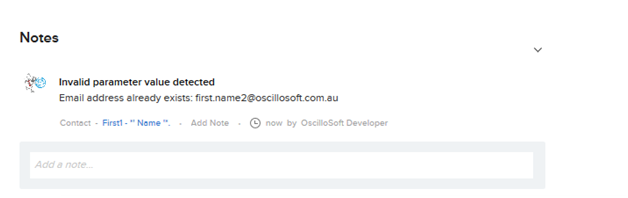
- If a duplicate email address is found or an email fails to be pushed, a note will be created in CRM Contacts Note. See below:
Screens after Moodle extension has been successfully installed
Screen 1 - Create custom fields in Contacts after successful installation
Screen 2 - When a student's status changes to Approved, it is pushed to Moodle, and a Moodle ID is set
Screen 3 - Browse the list of existing students to find the newly added Student

Related Articles
USER GUIDE - Zoho CRM 2 Moodle (Advanced)
CRM Modules Customizations: During the installation of the Moodle extension in your Zoho CRM, custom fields will be created in modules for easy operating and usage during the sync. Contacts: Moodle Role: dropdown values (Student, Teacher). Moodle ID: ...Installation Guide - Zoho CRM 2 Moodle (Advanced)
1. Installing the Extension You can go to Zoho Marketplace to install the extension, or log in to your Zoho CRM account to install. To install the extension 1.1 Click Setup > Marketplace > Extensions > All. All the installed extensions are listed. ...FAQ - Zoho CRM 2 Moodle
What are the basic requirements for this extension? To use our Zoho CRM 2 Moodle (Basic) extension, you need an active Zoho and Moodle account. How much is this Zoho Extension? Our Zoho CRM 2 Moodle extension costs $5 per month or $55 annually. What ...Demo - Zoho CRM 2 Moodle (Advanced)
The Moodle Advanced Extension for Zoho CRM allows your Zoho CRM to integrate records from standard modules such as Contacts, Deals (Enrollments), Courses (Products), and custom modules like Grades to your Moodle Learning Management System (LMS). Key ...Demo - Zoho CRM 2 Moodle (Basic)
The Zoho CRM 2 Moodle (Basic) extension allows users to push the records of the Contacts modules to the Moodle eLearning platform. As a result, users can manually skip the hassle of creating users in Moodle. They can just install the extension and ...