Setup Overview
Overview
Now that you have installed Oscillosoft's Zoho CRM 2 Xero extension you must be wondering how to actually sync your records between the two applications. We're happy to tell you that with our custom made portal, syncing is extremely easy to setup. Just follow these steps and you'll be ready in no time.
- Before we get started, open up two separate windows/tabs and head to these two links
- https://xero2zoho.saasplugin.com.au/login
- https://crm.zoho.com/
Log into the Zoho CRM to Xero portal with the login credentials we have provided you and log into Zoho CRM with your own Zoho account.
Using the Portal to Setup your Synchronization
Before we can begin with your syncing process we need to setup some settings. How these settings are setup can vary depending on your business itself so it is important to review these carefully. Firstly, head over to the Zoho CRM to Xero portal and login.
Once logged in you'll see four options on the sidebar. Select the 'Settings' option to see the additional options available. These mapping options are what you will need to setup as per your business requirements.

Field Mapping
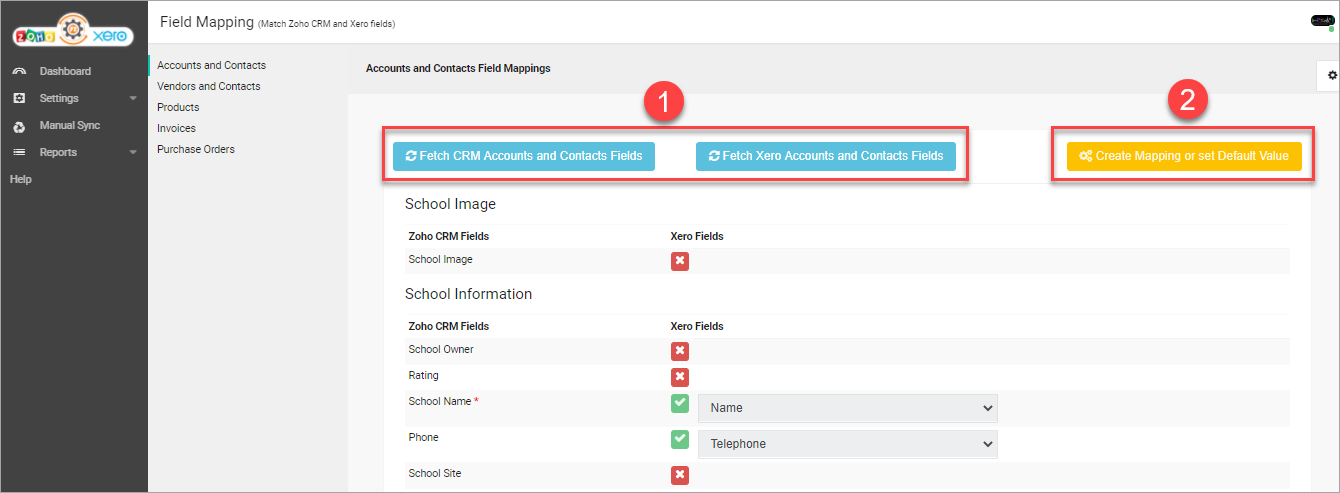
Here you are able to map your Zoho CRM field to those in your Xero application. Some mappings may already be setup for you. However, your business is unique so these mappings can vary depending on your business and as such we provide you with the option to select your own mappings.

1. Firstly, fetch the fields for the module from both Zoho CRM and Xero.
2. Click the 'Create Mapping or set Default value' button.
3. You can now select which Zoho CRM fields you wish to map. Click the button for the desired fields and pick the Xero field from the drop-down that appears.
4. If instead you wish to provide a default value then simply type the default value into the box in that row. You can find more fields by Simply scrolling down.
5. Once you're happy with your mappings for that module click the 'Save Settings' button.
6. You can also perform field mappings for other modules. Click this drop-down to view the other available modules. Please ensure you've saved before swapping modules.
Status Mapping
Each of your invoices/purchase orders will have a status associated with them, both in Xero and Zoho CRM. However, Xero and Zoho CRM use slightly different statuses. Here you will dictate which status in one application should be associated to the status of the other.
You can edit your status mappings in the same way.
1. Go to Settings > Status Mapping
2. Click the mapping button for invoices/purchase orders.
3. Fetch CRM and Xero Status
4. Cliick on create mapping.
5. Click checkbox of the Xero status you wish to map and pick a Zoho CRM status to match it from the drop-down.
5. Click checkbox of the Xero status you wish to map and pick a Zoho CRM status to match it from the drop-down.
6. When you're happy click 'Update Status Fields Mapping'.
Inventory Account and Tax Code Mapping
Your Xero Accounts can be mapped and you may need to do so if they haven't been setup already for you or if you wish to customise it yourself.
You can set your Tax mappings in the same way.
1. Go to Settings > Tax Mapping
2. Fetch CRM and Xero Taxes
3. Cliick on "Map with CRM taxes"
4. Click checkbox of the Xero status you wish to map and pick a Zoho CRM status to match it from the drop-down.
6. When you're happy click 'Save'.4. Click checkbox of the Xero status you wish to map and pick a Zoho CRM status to match it from the drop-down.
Conclusion
Congratulations, you've successfully setup your Zoho CRM 2 Xero plugin. You are now able to start syncing your records between these two useful applications to help streamline your business.
Related Articles
Step by Step Setup Guide
Overview This guide is designed to give you a detailed and comprehensive rundown of the Zoho CRM 2 Xero extension portal setup process. If any questions or confusions arise throughout the course of this guide, please send an email to ...Overview and Demo
This article will show you an overview of the whole plugin features, facilities, and benefits - You have Zoho CRM for your sales and marketing, and you use Xero for your accounting. So how do you keep both applications synced without doing it ...Zoho CRM 2 Direct SMS - Overview
Overview Zoho CRM 2 Direct SMS is an extension developed by Oscillosoft that allows users to send SMS from Zoho CRM Leads, Contacts, and Potentials Modules. Users can send custom SMS to individual customers or can send bulk SMS to up to 100 customers ...Zoho CRM 2 Burst SMS - Overview
Overview Zoho CRM 2 Burst SMS is an extension developed by Oscillosoft allowing users to send SMS from Zoho CRM Leads, Contacts, and Potentials Modules. You can even setup SMS for Event reminders! Users can send custom SMS to individual customers or ...Overview - Canvas LMS for Zoho CRM
There are plenty of users of Zoho CRM. And the number of users is growing every day. Zoho CRM provides tons of features to its users. To some extent, the features may not seem enough. For instance, it would be great if Zoho CRM could connect a ...